How to Downgrade WordPress to an Older Version?
Having issues with your theme or plugins usability? Downgrading WordPress to an older version could be a fast solution. We will show you some methods in this article to downgrade the WordPress core to a previous version.
Why to Downgrade WordPress?
Thousands of websites broken up with the latest WordPress 5.5 update. There were a number of problems, but the compatibility of the latest WordPress version with plugins and themes was one of the most popular. This means that because of these conflicts, any theme, plugin, or custom code that is not compliant with the current WordPress core displays error messages and crashes the websites.
We have already seen several methods to fix the problems with WordPress 5.5 and one of the best is to downgrade WordPress to a previous, stable version. While this does not address the compatibility issue with the new edition, before the incompatible themes and plugins receive an upgrade, it allows you to keep your site online.
So you'll learn various methods to downgrade the WordPress core in this guide.
In a staging environment, you can also test the compatibility to make sure that it works correctly before trying it on your website.
How to downgrade an earlier edition of WordPress?
3 important methods are available for downgrading WordPress to an older edition.
Manually
Usage of a plugin
By restoring a backup
All of them get the job done, but choose the one that best suits your needs and abilities. Now let's take a step-by-step look at each of them.
1) WordPress Downgrade Manually
Of the 3 methods, it is possibly the hardest for beginners to have to downgrade the WordPress core manually. It's really useful, however, specifically if you're locked out of your admin area of WordPress.
In this process, you will be required to download previous WordPress files from its official website, build an FTP account, upload those files using FileZilla, and make some changes to the files.
Let's see how step-by-step it can be handled.
CMS Core Download
Downloading the previous stable version of WordPress is the first thing you need to do. We are going to roll back to 5.4.2 for this reference. Go to the WordPress release page and download the files to do that.
You need to build an FTP account after that.
Create an FTP account
Now it is time to build an FTP account to access the file manager for your WordPress blog. If you're on a shared server, your control panel will have FTP account settings in place.
In the user dashboard, managed WordPress hosting businesses such as Kinsta and WP Engine have a dedicated section for the FTP account. Simply create your password and username and create an FTP account.
Log in to your file manager using any FTP client like FileZilla after that. We are going to use the FileZilla FTP client in our case.
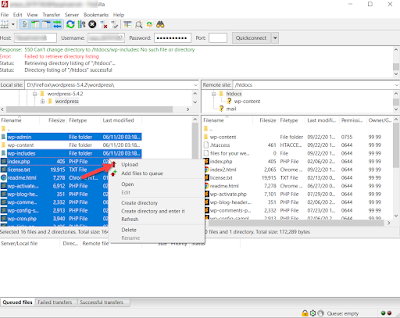
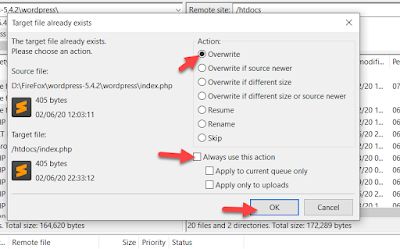
Data and Directories Update
Log in to your file manager after creating your FTP Account. There are some changes you'll have to make to the files.
Now you need to delete files with wp-admin and wp-includes. A lot of subfolders and files are included in both directories, so this step can take some time.
Please remember that since it includes your uploaded media and related data, you do not need to upload the wp-content folder.
Go to your WordPress admin section after downloading the new files, and press Update WordPress Database.
The database will now be updated by your computer. If your database is big, this could take some time, so be patient.
Then, using your username and password, log into your WordPress dashboard and you can see that the core version installed is now 5.4.2.
You've just manually downgraded WordPress! The process requires several steps, but you shouldn't have any problems if you follow them in order.
2) With a Plugin, downgrade WordPress
A more beginner-friendly option is to use a plugin to downgrade your WordPress installation. You may use many methods, but we suggest using WP Downgrade. This is a free plugin that allows you to update versions of WordPress and pick an old one with only a few clicks.
Activation and Installation
Second, the plugin needs to be activated on your site. So go to Plugins > Add New on your WordPress dashboard. Use the search bar to search for WP Downgrade and then install and trigger the tool on your site.
Then go to Settings > WP Downgrade. You will see the new version of WordPress there and you will need to decide the version that you want to downgrade to (or Target Version). You need to enter the exact version number so that you can search the official release page for WordPress.
We're running WordPress 5.5.1 in our case.
Let's say you want your core downgraded to 5.4.2 for WordPress. So, simply type 5.4.2 in the WordPress Target Version box. Please remember that the exact version number needs to be specified. Click the Save Changes button after that.
You can see that WordPress has been downgraded to the defined core version during the next page load.
The same thing can be seen on the WordPress update page.
This method is very successful and only takes a couple of clicks. So, if you want to update your version of WordPress without using third-party software such as FileZilla, this is a great choice for you.
3) Restore a Past Backup
Restoring a previous backup is the third way to downgrade WordPress to an older version. This will only work if your site has a backup. You may take a look at our guide on how to create a complete backup if you're not sure how to do that.
You need to make a backup of your website before WordPress is downgraded. This way, when you need it you will be able to restore this backup file. For this demo, using the UpdraftPlus plugin, we have created several demo backup files.
All you need to do when you want to restore a backup is to go to the WordPress admin plugin settings and click Restore on your target version.
By default, the plugin would import all your database tables, but the tables you don't want to restore can also be removed. Click on Restore after that.
And that's how, by restoring a backup, you downgrade WordPress to a previous update.
NOTE: It should be noted that controlled hosting solutions such as Kinsta, WP Engine, or Flywheel produce your website's regular backups. So, you don't need to rely on additional plugins to make backups if you are using either of those.
Tips on WordPress Downgrade
WordPress is the world's most common CMS, so hackers are constantly targeting WordPress sites and plugins. That's why we suggest that you generate daily backups of your site to keep your website and your files secure. This way, you can restore it and keep your business up and running if something bad happens. Check out our guide to create a full backup if you are not familiar with the method of making a backup.
Furthermore, we suggest storing the backup files in a safer location. So you can download them to your local storage or upload them to some other secure cloud storage service, such as Google Drive or Dropbox, instead of storing them on the same server.
Some backup plugins, such as BackupBuddy, allow you to migrate backup files to any third-party cloud storage or even an FTP server automatically. When you use a backup plugin, remember this.
Finally, it's a good idea to build a staging area prior to upgrading WordPress to the latest update. This way, before adding them to your web, you'll be able to test the changes. So if there is a problem, without damaging your website, you can fix it.
Conclusion
All in all, downgrading WordPress to an older version can be a good choice if you have issues with the new WordPress update, if you have problems with plugin or theme compatibility, or if you just want to run a previous version of WordPress.
We have seen various strategies for doing it in this guide:
Manually
A plugin with it
Restoring a previous backup
The manual method is the best for you if you've been locked out of your WordPress site. It takes some steps and it's not as easy as the other methods, but you won't have any problems if you're familiar with FTP and file uploading.
The plugin process, on the other hand, is the easiest way of downgrading WordPress. If you have access to your WordPress dashboard, simply install the app for WP Downgrade and return to a more secure version of WordPress.
Another easy way to get your site back online is to restore a previous backup. This process is quite simple but it will work only if you have a complete backup of your WordPress core.
Finally, if instead of downgrading WordPress you want to roll back to a previous version of your plugins and themes, we recommend you have a look at this guide that explains the process step-by-step.
Do you know any other methods to downgrade WordPress? Which one do you use? Let us know in the comments section below!


.jpg)

This comment has been removed by the author.
ReplyDeleteHow to Downgrade WordPress to an Older Version How to Downgrade WordPress to an Older Version Is Very Helpful. Thanks for such Information
ReplyDeleteLooking for WordPress Support Visit :
WordPress Support
WordPress Technical Support
WordPress Support Phone Number
Superb Information
ReplyDeleteWP Support
Awesome Information
ReplyDelete24/7 WordPress Support
24/7 WP Support
This comment has been removed by the author.
ReplyDeleteThanks for give us valuable information
ReplyDeleteWordPress Help
WordPress Technical Support
You can downgrade WordPress by installing a plugin switch free game like WP Downgrade or manually replacing core files with the older version from WordPress.org. Always back up your site first.
ReplyDeleteBranxify is a trusted WordPress development company delivering fast, secure, and scalable websites tailored to business growth.
ReplyDelete